The Fast Fourier Transform (FFT) is outright one of the most used and useful algorithm in signal processing. FFT was included In the January/February 2000 issue of Computing in Science and Engineering, by Jack Dongarra and Francis Sullivan who picked the “10 algorithms with the greatest influence on the development and practice of science and engineering in the 20th century”. FFT was one of them.
If you are interested in the commented list, a SIAM News article by Barry Cipra available here gives a summary for anyone can get hold of the original papers. Citing from Cipra, the FFT algorithm by James Cooley and John Tukey is “easily the most far-reaching algorithm in applied mathematics, the FFT revolutionised signal processing.”
The great thing about the Cooley-Tukey FFT algorithm is its scaling law. While performing the direct calculation of the discretised Fourier integral takes O[N2] operations for an array of size N, the Cooley-Tukey algorithm, making clever use of the symmetries of the problem, can be done in just O[N log(N)] steps.
Now, almost 20 years in the 21st century, we got an awesome new computing paradigm, which is based on GPU acceleration. GPUs work like a treat when handling large amount of data. Especially for signal and image processing, GPUs can parallelise the task very efficiently and, bottom line, they are much quicker than conventional CPUs.
Having said that, we need to get a few things right before being able to run our codes at GPU speed. In this post, we’ll give a very short overview on how to get 2D FFT and inverse FFT algorithms up and running in Python using GPU acceleration. These functions will require the NVIDIA CUDA® toolkit, PyCuda and scikit-cuda.
The 2D FFT functions we are about to show are designed to be fully compatible with the corresponding numpy.fft.fft2 (and numpy.fft.ifft2) so that you should, in principle, be able to just drop it into your code without other major changes.
For additional documentation on the specific functions, take a look at the scikit-cuda docs on the FFT here.
OK, let’s dive into it. For all that follows we’ll leverage on the most useful pyCUDA (Pythonic access to Nvidia’s CUDA parallel computation API) and scikit-cuda.
First let’s write the imports:
import numpy as np
import pycuda.autoinit
import pycuda.gpuarray as gpuarray
import skcuda.fft as cu_fft
And here’s the function.
def fft2_gpu(x, fftshift=False):
''' This function produce an output that is
compatible with numpy.fft.fft2
The input x is a 2D numpy array'''
# Convert the input array to single precision float
if x.dtype != 'float32':
x = x.astype('float32')
# Get the shape of the initial numpy array
n1, n2 = x.shape
# From numpy array to GPUarray
xgpu = gpuarray.to_gpu(x)
# Initialise output GPUarray
# For real to complex transformations, the fft function computes
# N/2+1 non-redundant coefficients of a length-N input signal.
y = gpuarray.empty((n1,n2//2 + 1), np.complex64)
# Forward FFT
plan_forward = cu_fft.Plan((n1, n2), np.float32, np.complex64)
cu_fft.fft(xgpu, y, plan_forward)
left = y.get()
# To make the output array compatible with the numpy output
# we need to stack horizontally the y.get() array and its flipped version
# We must take care of handling even or odd sized array to get the correct
# size of the final array
if n2//2 == n2/2:
right = np.roll(np.fliplr(np.flipud(y.get()))[:,1:-1],1,axis=0)
else:
right = np.roll(np.fliplr(np.flipud(y.get()))[:,:-1],1,axis=0)
# Get a numpy array back compatible with np.fft
if fftshift is False:
yout = np.hstack((left,right))
else:
yout = np.fft.fftshift(np.hstack((left,right)))
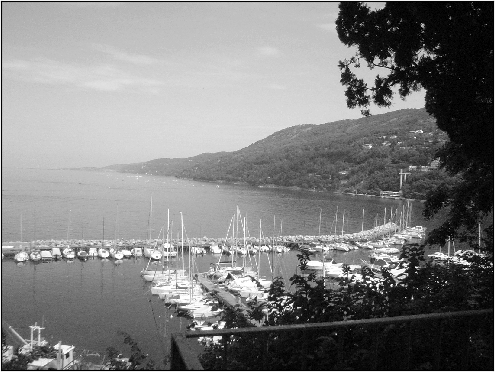
return yout.astype('complex128') To test this function, let’s import an image in 16-bit and convert it to grayscale – shown above.
from skimage import color
im = plt.imread('DSC01556.JPG').astype('uint16')
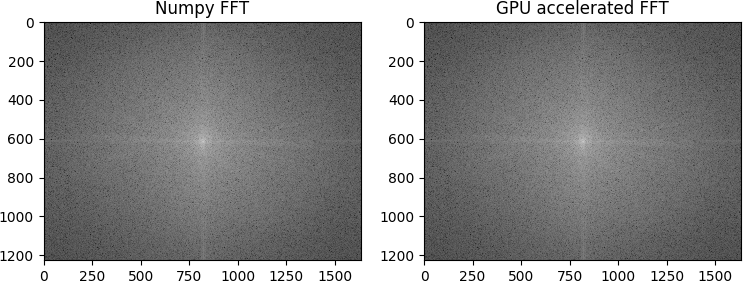
img = color.rgb2gray(im)Then we compare the result of our GPU-accelerated FFT with the conventional Numpy FFT.
fft1 = np.fft.fftshift(np.fft.fft2(img))
fft2 = fft2_gpu(img, fftshift=True)
As you can see, the result is pretty good: you can verify by yourselves that the two output array are identical for all practical purposes.
A few comments on the fft2_gpu function.
y.get()fftshiftoption.np.fliplr and np.flipud commands can be replaced by np.flip if your Nupy version is 1.12.0 or newer.Here’s the function to do the inverse FFT.
def ifft2_gpu(y, fftshift=False):
''' This function produce an output that is
compatible with numpy.fft.ifft2
The input y is a 2D complex numpy array'''
# Get the shape of the initial numpy array
n1, n2 = y.shape
# From numpy array to GPUarray. Take only the first n2/2+1 non redundant FFT coefficients
if fftshift is False:
y2 = np.asarray(y[:,0:n2//2 + 1], np.complex64)
else:
y2 = np.asarray(np.fft.ifftshift(y)[:,:n2//2+1], np.complex64)
ygpu = gpuarray.to_gpu(y2)
# Initialise empty output GPUarray
x = gpuarray.empty((n1,n2), np.float32)
# Inverse FFT
plan_backward = cu_fft.Plan((n1, n2), np.complex64, np.float32)
cu_fft.ifft(ygpu, x, plan_backward)
# Must divide by the total number of pixels in the image to get the normalisation right
xout = x.get()/n1/n2
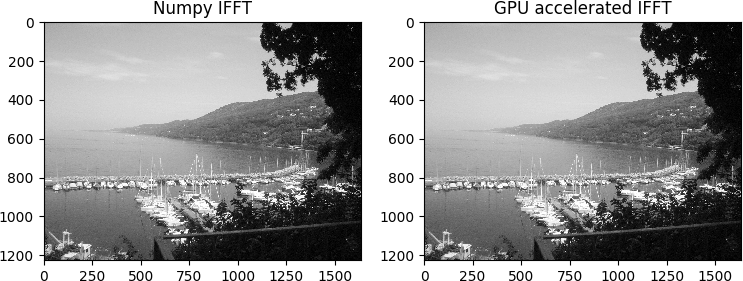
return xoutTo test this function we calculate the inverse transform of the previous array, to verify that we get the original image back.
img1 = np.real(np.fft.ifft2(np.fft.ifftshift(fft1)))
img2 = ifft2_gpu(fft2, fftshift=True)
In closing, we measured the speedup we got using GPU acceleration. We run the code on a 3.20GHz, 6 cores (12 threads) Ubuntu 16.04.1 LTS with Python 3.5.2 (only a single thread is used for all CPU runs).
On the average of ten runs, Numpy FFT takes 0.31 s and GPU accelerated FFT takes 0.041, which is about 7.6 times faster on our machine.
That’s it for today. Feel free to send us comments or suggestions using the box below. Thanks for stopping by!
| Cookie | Duration | Description |
|---|---|---|
| cookielawinfo-checkbox-analytics | 11 months | This cookie is set by GDPR Cookie Consent plugin. The cookie is used to store the user consent for the cookies in the category "Analytics". |
| cookielawinfo-checkbox-functional | 11 months | The cookie is set by GDPR cookie consent to record the user consent for the cookies in the category "Functional". |
| cookielawinfo-checkbox-necessary | 11 months | This cookie is set by GDPR Cookie Consent plugin. The cookies is used to store the user consent for the cookies in the category "Necessary". |
| cookielawinfo-checkbox-others | 11 months | This cookie is set by GDPR Cookie Consent plugin. The cookie is used to store the user consent for the cookies in the category "Other. |
| cookielawinfo-checkbox-performance | 11 months | This cookie is set by GDPR Cookie Consent plugin. The cookie is used to store the user consent for the cookies in the category "Performance". |
| viewed_cookie_policy | 11 months | The cookie is set by the GDPR Cookie Consent plugin and is used to store whether or not user has consented to the use of cookies. It does not store any personal data. |